In the previous article, we introduced the data set API and how to perform data set look ups. Next step is to visualize this data set in a graphical way. So translating that into Dashbuilder language: to create a Displayer. A Displayer is a component responsible for rendering a data visualization component such as a bar chart, pie chart, tables, etc. This article explains how you can create a displayer to visualize your data.
There exist two methods:
- The Data Displayer UI Editor
This is a UI component used to configure all the data set look up, displayer settings and other stuff. Can be used to create, update or remove data displayers at runtime.
- The Dashbuilder's Displayer API
Instead of creating the displayer at runtime using the UI, you can create displayers at compile time using the Dashbuilder's API.
Creating a displayer from the UI
You can create, update or remove displayers at runtime using the Displayer Editor. This is the initial screen of this component:
 |
| Data Displayer Editor component |
As you can see, there exist three main tabs:
- Types tab - Allows to select the displayer type, such as bar chart, pie chart, table, etc.
- Data tab - Allows to configure the data set look up for that displayer in order to fetch the data that will be displayed.
- Display tab - Allows to select a renderer and configure the settings for the displayer type selected. the set of settings available varies depending on the displayer type and renderer selected.
So the steps to create or update a displayer are:
- Choose the desired visualization type from the type tab. In this example. a Line Chart is selected.
 |
Data Displayer Editor - Type tab
|
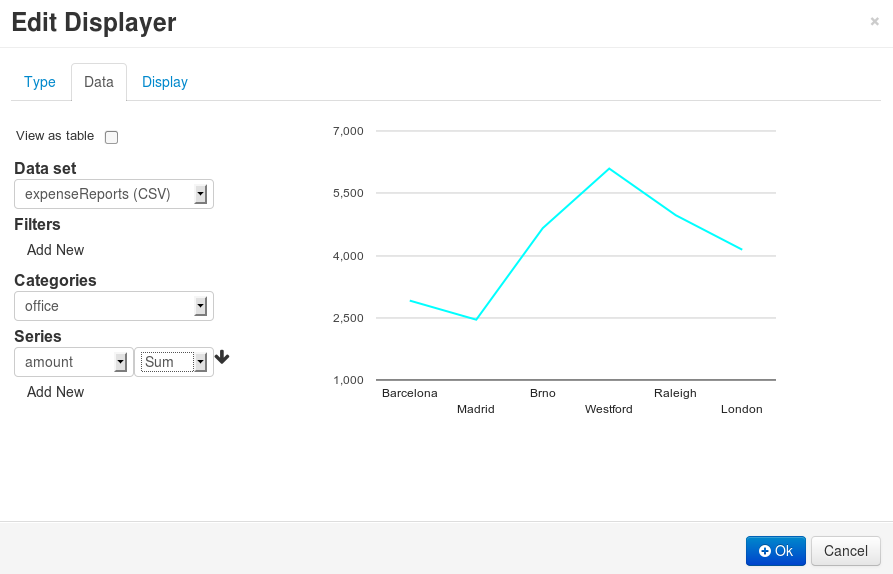
- Click on the Data tab and configure the data lookup settings.
 |
| Data Displayer Editor - Data tab |
- First step is to select a Data Set instance. In that case we are using the expenseReports data set.
- You can filter the data set rows by adding filters in the Filters section.
- Select the categories property for the Line chart, in this case, the office data property.
- Add the series for the Line chart: the property and the function to apply. In this example, we are using the sum function to calculate the amount per office.
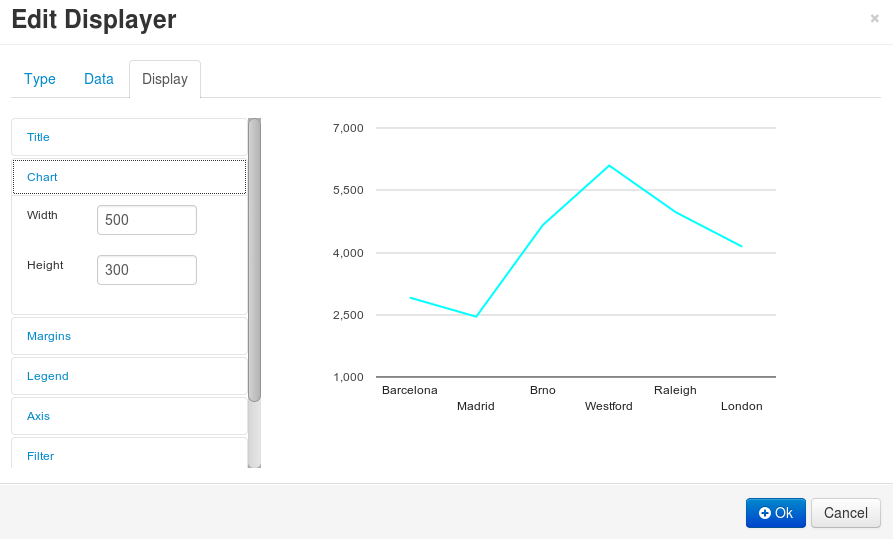
- Click on Display tab to configure the display settings.
 |
| Data Displayer Editor - Display tab |
In this tab you have all the displayer settings available for the displayer type selected. Here you can configure the chart position, chart size, chart title, axis titles, margins, legend, tooltips and much more.
Another interesting setting is the renderer selector. It allows to change the RendererLibrary for type of chart. For example, we can switch from GWT to Lienzo charts by just changing the selector value:
 |
| Renderer selector |
Note that this selector only appears when there exist more than one renderer for the selected displayer type.
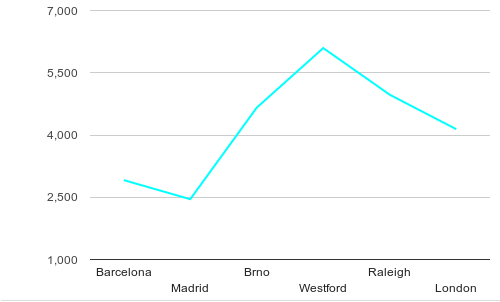
- Once the type, the data lookup and display settings are configured, just click the OK button to see the results. The chart is rendered according the set of settings defined:
 |
| Displayer built using Data Displayer Editor in the UI |
Creating a chart using the Displayer API
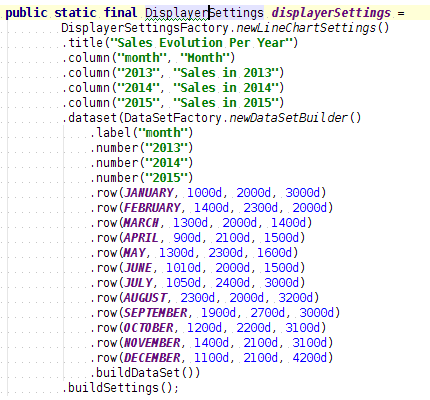
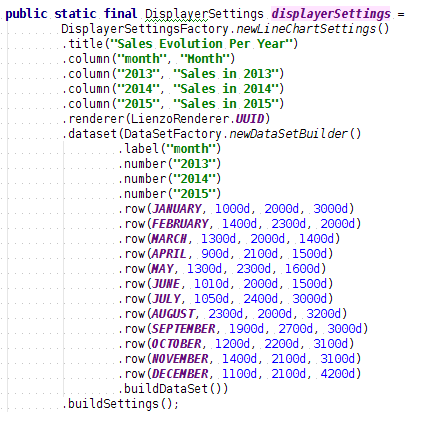
You can also use the Dashbuilder's API to create a Displayer instance. Basically, the first step is to create a DisplayerSettings instance and use this instance to lookup a Displayer instance that will show the data visualization component. Next screenshot is an example of a DisplayerSettings used to build a Line chart with a data set that contains the sales evolution per year:
 |
| DisplayerSettings creating using Dashbuilder's API |
From the code above:
- Use of DisplayerSettingsFactory to create a DisplayerSettings instance for a displayer type, in this example, a line chart.
- Configure the Displayer configuration parameters such as title, columns, filters and so on. Several API methods are available in the DisplayerSettings interface: title, columns, filters, renderer, sort operations, grouping, etc.
- Configure a DataSetLookup.
- You can create a new data set inline as in the example by using the DataSetFactory component.
- You can use an existing data set by specifying its UUID (the data set must have been previously deployed or created using the UI).
- Last step is to call the buildSettings method from DisplayerSettingsFactory. It provides the DisplayerSettings instance for your settings.
If you want to
use a concrete RendererLibrary for rendering the displayer, you can use the
renderer method from
DisplayerSettings as:
 |
| Using a concrete renderer via API |
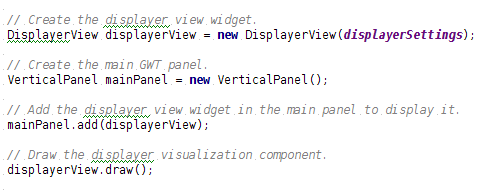
Once you have the
DisplayerSettings instance built you can use the
DisplayerHelper class to visualize your displayer in your view page. As easy as follows:
 |
| Creating your view |
As you can see, the constructor for the
DisplayerView helper class requires the
DisplayerSettings instance previously built and it can be added in any GWT panel, as it's considered a composite GWT widget.
Once
DisplayerHelper widget instance is created and added into your view panels, you can use the
draw method to display it.
Finally your view look like:
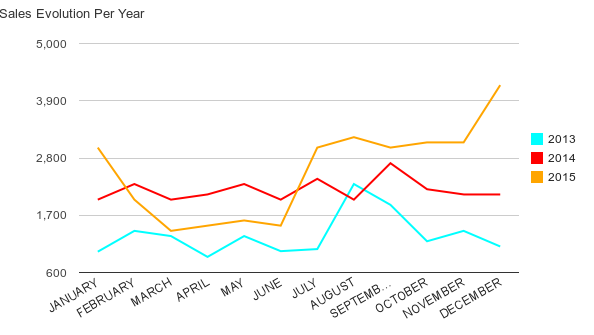 |
| Displayer created using Dashbuilder's API |
and.... that's all! :-). For those interested in the API details, please take a look at the Dashbuilder gallery which contains more examples of how to build displayer instances using the API -
Gallery examples.


Good to see uberfire-extensions put to good use! Would the renderer builder method be better suited to take a FQCN than UUID?
ReplyDeleteUUID is shorter and it also abstracts from the real implementation class. uberfire-extensions +1 :-)
ReplyDelete